Single Page Todo App with CacheManager
This is about creating a single page web app using an ASP.NET Web API 2 Service which stores the data via Cache Manager. I will explain the service implementation and usage of Cache Manager, and also discuss how to host the newly created site on Azure and how to configure Azure's Redis cache.
To implement the site, I will use an existing AngularJS based example from todomvc.com. All credits for this part of this sample site goes to them of course.
You can see the sample site in action on cachemanager-todo.azurewebsites.net or browse the code on Github.
If you don't know what the todo app does, go to todomvc.com, there are many different implementations of the same application which look similar to this:
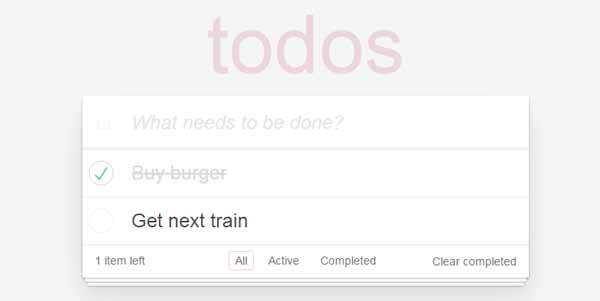
Basic Functionalitylink
With this simple app, the user can add new todos, edit existing ones, delete them and set them to completed state. There is also a delete "all completed" function.
Service Definitionlink
This single page application will use a web API service to store or remove the todos and which has to provide the following methods:
Get- Retrieves all existingtodosGet(id)- Retrieves onetodobyidPost(todo)- Creates a newtodo, assigns a newidand returns it.Put(todo)- Updates thetodoDelete(id)- Removes onetodobyidDelete- Removes all completedtodos
Project setuplink
I will implement the service with ASP.NET Web API, so let's create an empty Web API project and add the sample code to it. Our solution will look like that:
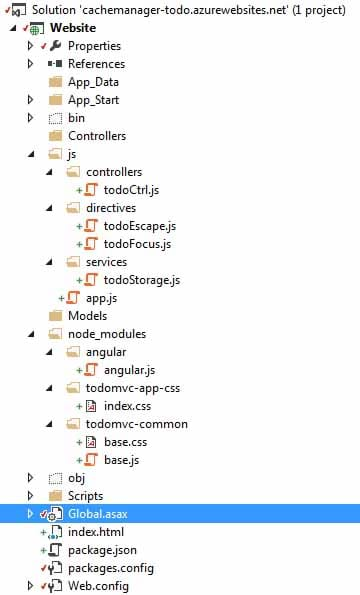
Hint Don't worry, you can simply get the full source code of this sample from the Github repository.
I also installed some additional nuget packages, CacheManager packages, Unity and Json.Net.
Modellink
Let's add the Todo Model to the solution, the model has three properties: Id, Title and Completed.
using System;
using System.Linq;
using Newtonsoft.Json;

namespace Website.Models
{
    [Serializable]
    [JsonObject]
    public class Todo
    {
        [JsonProperty(PropertyName = "id")]
        public int Id { get; set; }

        [JsonProperty(PropertyName = "title")]
        public string Title { get; set; }

        [JsonProperty(PropertyName = "completed")]
        public bool Completed { get; set; }
    }
}
To get the JavaScript typical camelCase casing, we define the JsonProperty's name. Also, we have to mark the object to be Serializable otherwise cache handles like the Redis handle cannot store the Todo entity.
Setting Up Cache Managerlink
Our service should use Cache Manager to store and retrieve the todo items. To make the Cache Manager instance accessible by the controller, I will use Unity as IoC container. This could be done in many different ways of course, use whatever IoC container you prefer.
In Global.asax during app initialization (Application_Start), we just have to create the IUnityContainer and register the Cache Manager instance.
To have Unity inject the Cache Manager instance into our controller every time the controller gets instantiated by the framework we have to also tell the Web API framework to use Unity as the dependency resolver.
   public class WebApiApplication : System.Web.HttpApplication
   {
       protected void Application_Start()
       {
           GlobalConfiguration.Configure(WebApiConfig.Register);

           var container = new UnityContainer();
           GlobalConfiguration.Configuration.DependencyResolver = new UnityDependencyResolver(container);

           var cacheConfig = ConfigurationBuilder.BuildConfiguration(settings =>
           {
               settings
                   .WithSystemRuntimeCacheHandle("inprocess");
           });

           container.RegisterType(
               typeof(ICacheManager<>),
               new ContainerControlledLifetimeManager(),
               new InjectionFactory(
                   (c, t, n) => CacheFactory.FromConfiguration(
	                   t.GetGenericArguments()[0], cacheConfig)));
       }
   }
In the API Controller, I will add a property whith the Dependency attribute on. This will let Unity set the property for us. We could also use constructor based injection, but this would be more code to write...
[Dependency]
protected ICacheManager<object> todoCache { get; set; }
Implementing the Rest Servicelink
Let's create the service. I will let MVC scaffold a full CRUD Web API controller.
The generated code will be using string as types, we'll have to change that to our Todo model.
How Do We Store the Itemslink
We know we have to retrieve all and remove subsets of the todos. We could store the Todos as one list but this is usually not very efficient if we think about scaling and performance.
The better solution is to store each item independently.
That being said, this solution makes it a little bit more difficult to retrieve all Todos from cache.
One way of solving this is to put another key into the cache which stores all available ids.
This way, we also have a way to generate new ids; if we know all existing ids, we can simply create a new one...
Let's go ahead and implement this solution:
I'll add a simple private property to retrieve the list of ids. If the key is not present, I'll add an empty array into the cache. This is necessary because we want to call Update later on, and if there is no cache key to update, the method doesn't do anything!
I'm using Add in this case because it adds the value only if it is not already present to prevent eventual issues in distributed environments.
// key to store all available todos' keys.
private const string KeysKey = "todo-sample-keys";

// retrieves all todos' keys or adds an empty int array if the key is not set
private List<int> AllKeys
{
    get
    {
        var keys = todoCache.Get<int[]>(KeysKey);

        if (keys == null)
        {
            keys = new int[] { };
            todoCache.Add(KeysKey, keys);
        }

        return keys.ToList();
    }
}
Implementing Get and Get by Idlink
We can use the AllKeys property and iterate over it to return the list of Todo´s.
// GET: api/ToDo
public IEnumerable<Todo> Get()
{
    var keys = this.AllKeys;

    foreach (var key in keys)
    {
        yield return this.Get(key);
    }
}

// GET: api/ToDo/5
public Todo Get(int id)
{
    return todoCache.Get<Todo>(id);
}
Implementing Putlink
Updating an existing item is also very easy, we just have to use cache.Put:
// PUT: api/ToDo/5
public void Put(int id, [FromBody]Todo value)
{
    todoCache.Put(id, value);
}
Implementing Postlink
Creating a new item is a little bit more complex because we store all the available ids on a separated cache key and to create new items, we have to "generated" unique ids.
To do this safely, even with distributed caches, we can use the Cache Manager's Update method.
If we would use Put or Add instead, we would run into concurrency issues with multiple clients using the same id for new items.
// POST: api/ToDo
public Todo Post([FromBody]Todo value)
{
    int newId = -1;
    todoCache.Update(KeysKey, obj =>
    {
        var keys = (obj as int[]).ToList();
        newId = !keys.Any() ? 1 : keys.Max() + 1;
        keys.Add(newId);
        return keys.ToArray();
    });

    value.Id = newId;
    todoCache.Add(newId, value);
    return value;
}
As discussed in the article about the Update method, the Action you pass in might be called multiple times depending on version conflicts. We will always receive the "latest" value though, in this case obj.
If a version conflict occurs during the update process, our changes will be discarded and the Action runs again, this means we will not add the new id multiple times, only the Max value will be different on every iteration.
At the end, we can set the Id property of our Todo, finally Add it to our cache and return it.
Implementing Deletelink
To delete all completed Todo´s, we'll have to iterate over all existing Todos, check the Completed state and call Delete by id.
// DELETE ALL completed: api/ToDo
public void Delete()
{
    var keys = this.AllKeys;

    foreach (var key in keys)
    {
        var item = this.Get(key);
        if (item != null && item.Completed)
        {
            this.Delete(item.Id);
        }
    }
}
Implementing Delete by Idlink
Delete by Id is similar to Post, we also have to update the key holding all the Todos´ ids. Same thing here, we'll use the Update method to ensure we work on the correct version of the array.
// DELETE: api/ToDo/5
public void Delete(int id)
{
    todoCache.Remove(id);
    todoCache.Update(KeysKey, obj =>
    {
        var keys = (obj as int[]).ToList();
        keys.Remove(id);
        return keys.ToArray();
    });
}
Using Cache Manager to Scalelink
As you might have recognized, in the "Setting up Cache Manager" section of this article, I only specified one in-process cache handle. This would mean that our Todos are stored in memory only and will be flushed whenever the app gets restarted.
To persist our Todos, we could use some distributed cache like Redis or couchbase.
With Cache Manager, this is extremely easy to change. Just a few lines of configuration and there are no changes needed in our API controller!
var cacheConfig = ConfigurationBuilder.BuildConfiguration(settings =>
{
    settings
        .WithSystemRuntimeCacheHandle("inprocess")
            .WithExpiration(ExpirationMode.Absolute, TimeSpan.FromMinutes(10))
        .And
        .WithRedisConfiguration("redisLocal", "localhost:6379,ssl=false")
        .WithRedisCacheHandle("redisLocal", true);
});
The configuration now has two cache handles! A "first level" in-process cache, and the "second level" distributed cache. This way, we can reduce the traffic to the Redis server which will make our application a lot faster.
Hostinglink
If we now host this site on Azure for example, we can change the configuration slightly and use a connection string instead of hard coded connection parameters.
We can also use the Cache Manager's backplane feature, to keep the configured first level in-process cache in sync.
var cacheConfig = ConfigurationBuilder.BuildConfiguration(settings =>
{
    settings
        .WithSystemRuntimeCacheHandle("inprocess")
            .WithExpiration(ExpirationMode.Absolute, TimeSpan.FromMinutes(10))
        .And
        .WithRedisBackplane("redis.azure.us")
        .WithRedisCacheHandle("redis.azure.us", true);
});
You can either add the connection string via web.config ConnectionStrings section, or add it via Azure Management Portal (which is the preferred way for security reasons...).
On the Azure Management Portal, click on your web app, "All Settings", "Application Settings" and scroll down to "Connection Strings" and add the connection string to the list.
It should look similar to this:
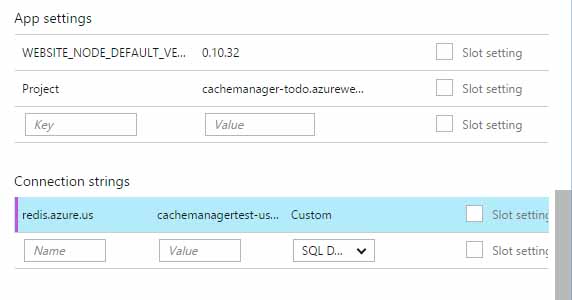
The connection string itself must contain at least the host, SSL being set to true and the password being set to one of the Redis Access Keys provided by the portal.
hostName:6380,ssl=true,password=ThEaCcessKey
And that's it, you can see the sample site in action on cachemanager-todo.azurewebsites.net and browse the code on Github.